Building my FreeBSD-based home router
How I built the router I use at home, from hardware to configuration.

The finished router. Clearly, the most important thing about a router is support for googly eyes.
Hardware
I used a PCEngines APU3, because PCEngines hardware is great, because it is passively cooled, because it has all the connectivity/expansion I want, and because the cases look awesome (see above).
I also got one of their wireless modules and a pair of antennas + pigtails, and the nice aluminium case. I added a 3rd party SSD and a 3G modem.
If you don’t need a large SSD, it is possible (and cheaper) to boot from an SD card.
You really shouldn’t bother with 3G unless you know you want to.
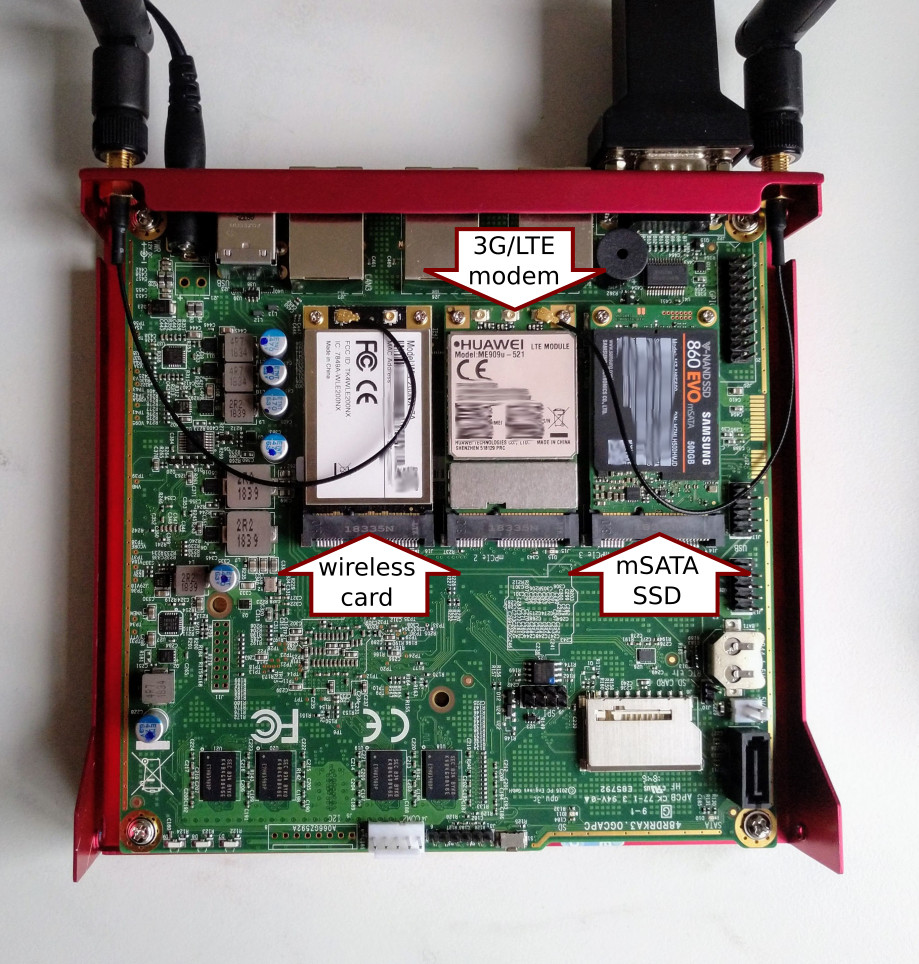
The modules I added to the APU. Note that for my use case I connected one of the antennas to the modem.
Because my wireless card is 11g only, I actually only need one antenna for WiFi. I decided to use the other antenna for 3G, because, conveniently, it is there. I will replace it with a proper 3G antenna (so, 2.1GHz instead of the WiFi’s 2.4) once I get one. In the meantime, this setup works surprisingly well.
Note the following:
- In case only one antenna is used for wireless, it should be connected to the first connector (so, 0 if they are labelled 0 and 1, or 1 if they are labelled 1 and 2).
- This 3G modem has 3 antenna connectors, and according to its datasheet these are ‘M’ for “main”, ‘G’ for GPS, and ‘A’ for “auxiliary” (¯\_(ツ)_/¯). The antenna should be connected to “main”.
Software
I chose to use FreeBSD and configure it as a router “by hand”. If you’d prefer to use a ready-made solution which can be configured using a web interface, but still has the full power of FreeBSD underneath, pfSense is a great option.
Installation
Booting the installation image
I used a USB stick (FreeBSD-12.0-RELEASE-amd64-mini-memstick.img). Booting it over network also works.
The APU needs to be installed over serial. This is a more detailed write-up that I followed, here is a quick reference:
- The APU’s baud rate is 115200 (PCEngines).
- One of the many options for opening a serial console:
cu -l /dev/ttyUSB0 -s 115200. - At boot menu, press 3 to escape to loader prompt. Don’t mind the messed up screen, we’ll fix that now. Set up serial by typing:
set comconsole_speed="115200" set console="comconsole" - Avoid an annoying race condition by typing
kern.cam.boot_delay="10000" - Then type
bootto boot.
Installation options
I got a 500GB mSATA SSD because it was kinda cheap and I want to do more than just routing. Therefore, I installed with root-on-ZFS because it shouldn’t eat that much RAM with just one disk and ZFS is awesome. After installation and with everything set up, I am using only about 400M of memory and a quick dd conv=sync test shows write speed of 280MB/s, so it appears that the system is happy with ZFS.
I checked all security options besides the ones that would interfere with debugging (the reasoning being that I want to be able to debug any problems and otherwise I can afford to enable everything.)
I did not create a non-root user because my config management takes care of that.
Post-installation config
After the installation finished, I opened a shell to immediately configure a few things:
/etc/sshd/sshd_config: setPermitRootLogin without-passwordso I can ssh in- add my SSH key to the root account
- configure serial console, so that it’s there: in
/boot/loader.conf:console="comconsole" comconsole_speed="115200"
Things it can do + how
3G modem
This Just Works (TM) with the default configuration file. (My SIM card has no PIN.)
Test with ppp -background u3g and see if it works.
Modems are magic, but actually unless you need a username/password or SIM PIN, this should Just Work because the network provider provisions settings like APN.
(In case something needs to be changed, the settings live in /etc/ppp/ppp.conf.)
To start ppp on boot, enable it in /etc/rc.conf:
ppp_enable="YES"
ppp_profile="u3g"
ppp_mode="ddial"  # brings the link up if it is dropped
Modems are evil and might not work after a reboot because they haven’t been sufficiently power-cycled. Mine does that. Workaround: Pull out the power cable for a few seconds instead of a soft reboot.
Idea (NOT working for me yet):
# Power off the 3G modem before shutting down
usbconfig -d `usbconfig | grep -i huawei | cut -d: -f1` power_off
Basic router setup (gateway + NAT for v4)
I used dhcpd as my DHCP server (pkg install dhcpd).
Files that need editing:
/etc/rc.conf: add:gateway_enable="YES" ipv6_gateway_enable="YES" pf_enable="YES" dhcpd_enable="YES"/usr/local/etc/dhcpd.conf:option domain-name "home.kamila.is" option domain-name-servers 9.9.9.9 # or use local DNS, e.g. with unbound default-lease-time 86400; max-lease-time 604800; subnet 192.168.0.0 netmask 255.255.0.0 { range 192.168.0.100 192.168.0.200; option routers 192.168.0.1; }/etc/pf.conf: Here’s a minimal and too permissive config:##### Macros ################################################################ int_net = "192.168.0.0/16" ext_if = "tun0" ##### Tables ################################################################ ##### Options ############################################################### set skip on lo ##### Traffic normalization ################################################# scrub in all ##### Queueing ############################################################## ##### Translation ########################################################### nat log on $ext_if inet from $int_net to any -> ($ext_if) ##### Packet filtering ###################################################### block log all # this should probably block more pass in from $int_net pass out on $ext_if all pass inet proto icmp from $int_net # allow some ICMP for troubleshooting ##### Packet filtering overrides ########################################### pass quick inet proto icmp all icmp-type echoreq # always allow ping pass quick proto tcp from any to any port ssh # always allow ssh
You probably also need to add ifconfig lines for your wired interfaces, and probably bridge some things. I didn’t bother, as none of my usual devices have an Ethernet port, so if I end up using those wired NICs, I’ll configure them separately.
Wireless AP
- in
/etc/rc.conf:wlans_ath0="wlan0" # replace CH with your country code to select # the right regulatory domain for wireless transmission create_args_wlan0="wlanmode hostap country CH" # use 11n if you have it; pick a reasonable channel; # experiment with txpower to find the lowest that works for you ifconfig_wlan0="inet 192.168.0.1/16 mode 11g channel 3 txpower 7" hostapd_enable="YES" /etc/hostapd.conf:interface=wlan0 debug=1 ctrl_interface=/var/run/hostapd ctrl_interface_group=wheel ssid=<SSID> wpa=2 wpa_passphrase=<PASSPHRASE> wpa_key_mgmt=WPA-PSK wpa_pairwise=CCMP
Up next
Things I haven’t done yet but want to in the future.
IPv6
I need to get IPv6 connectivity (via an OpenVPN tunnel, as my provider doesn’t offer native IPv6) and then also enable IPv6 on my wifi.
+++
pkg install wireguard
wireguard-go wg0

# generate keys
umask 0777
wg genkey > private
wg genkey < private > public
# send public to ungleich :-) (or whoever :D)

# configure the interface
Complete and publishable configuration
I want to have all the configuration in ansible (using my BSDops) and thereby make it completely trivial to reproduce my setup. That is not quite the case yet.
Caching DNS with unbound
While this is only one config file and I could just do it immediately, I’ll call it “blocked” until I have the above, because I want that config file to be templated and managed by bsdops.
Separate “guest” WiFi
My wifi has some devices that I might not want to expose to everyone who visits my flat. Having two SSIDs, one of which I don’t share, would simplify access control.
Automatic failover of the uplink
Once I no longer live on 3G: Use link aggregation to seamlessly failover from ethernet to 3G and back.
SCION!
Make SCION runnable on FreeBSD and become one of the first households with native SCION connectivity.
Notes to self:
- add zfs-periodic
- backups via zfs-send
- run SCION with runit
- check that the SCION web UI is read-only and if yes, make it accessible over the network
- add runit and run things like my homemade thermostat